

Exterior painting’s importance goes beyond aesthetics especially for Dublin, CA area homes. A fresh coat of paint protects exterior surfaces against the elements, prevents future flaws, helps maintain its structural integrity, boosts a home’s curb appeal, and potentially increases its property value. Some exterior paints even improve a home’s energy efficiency.
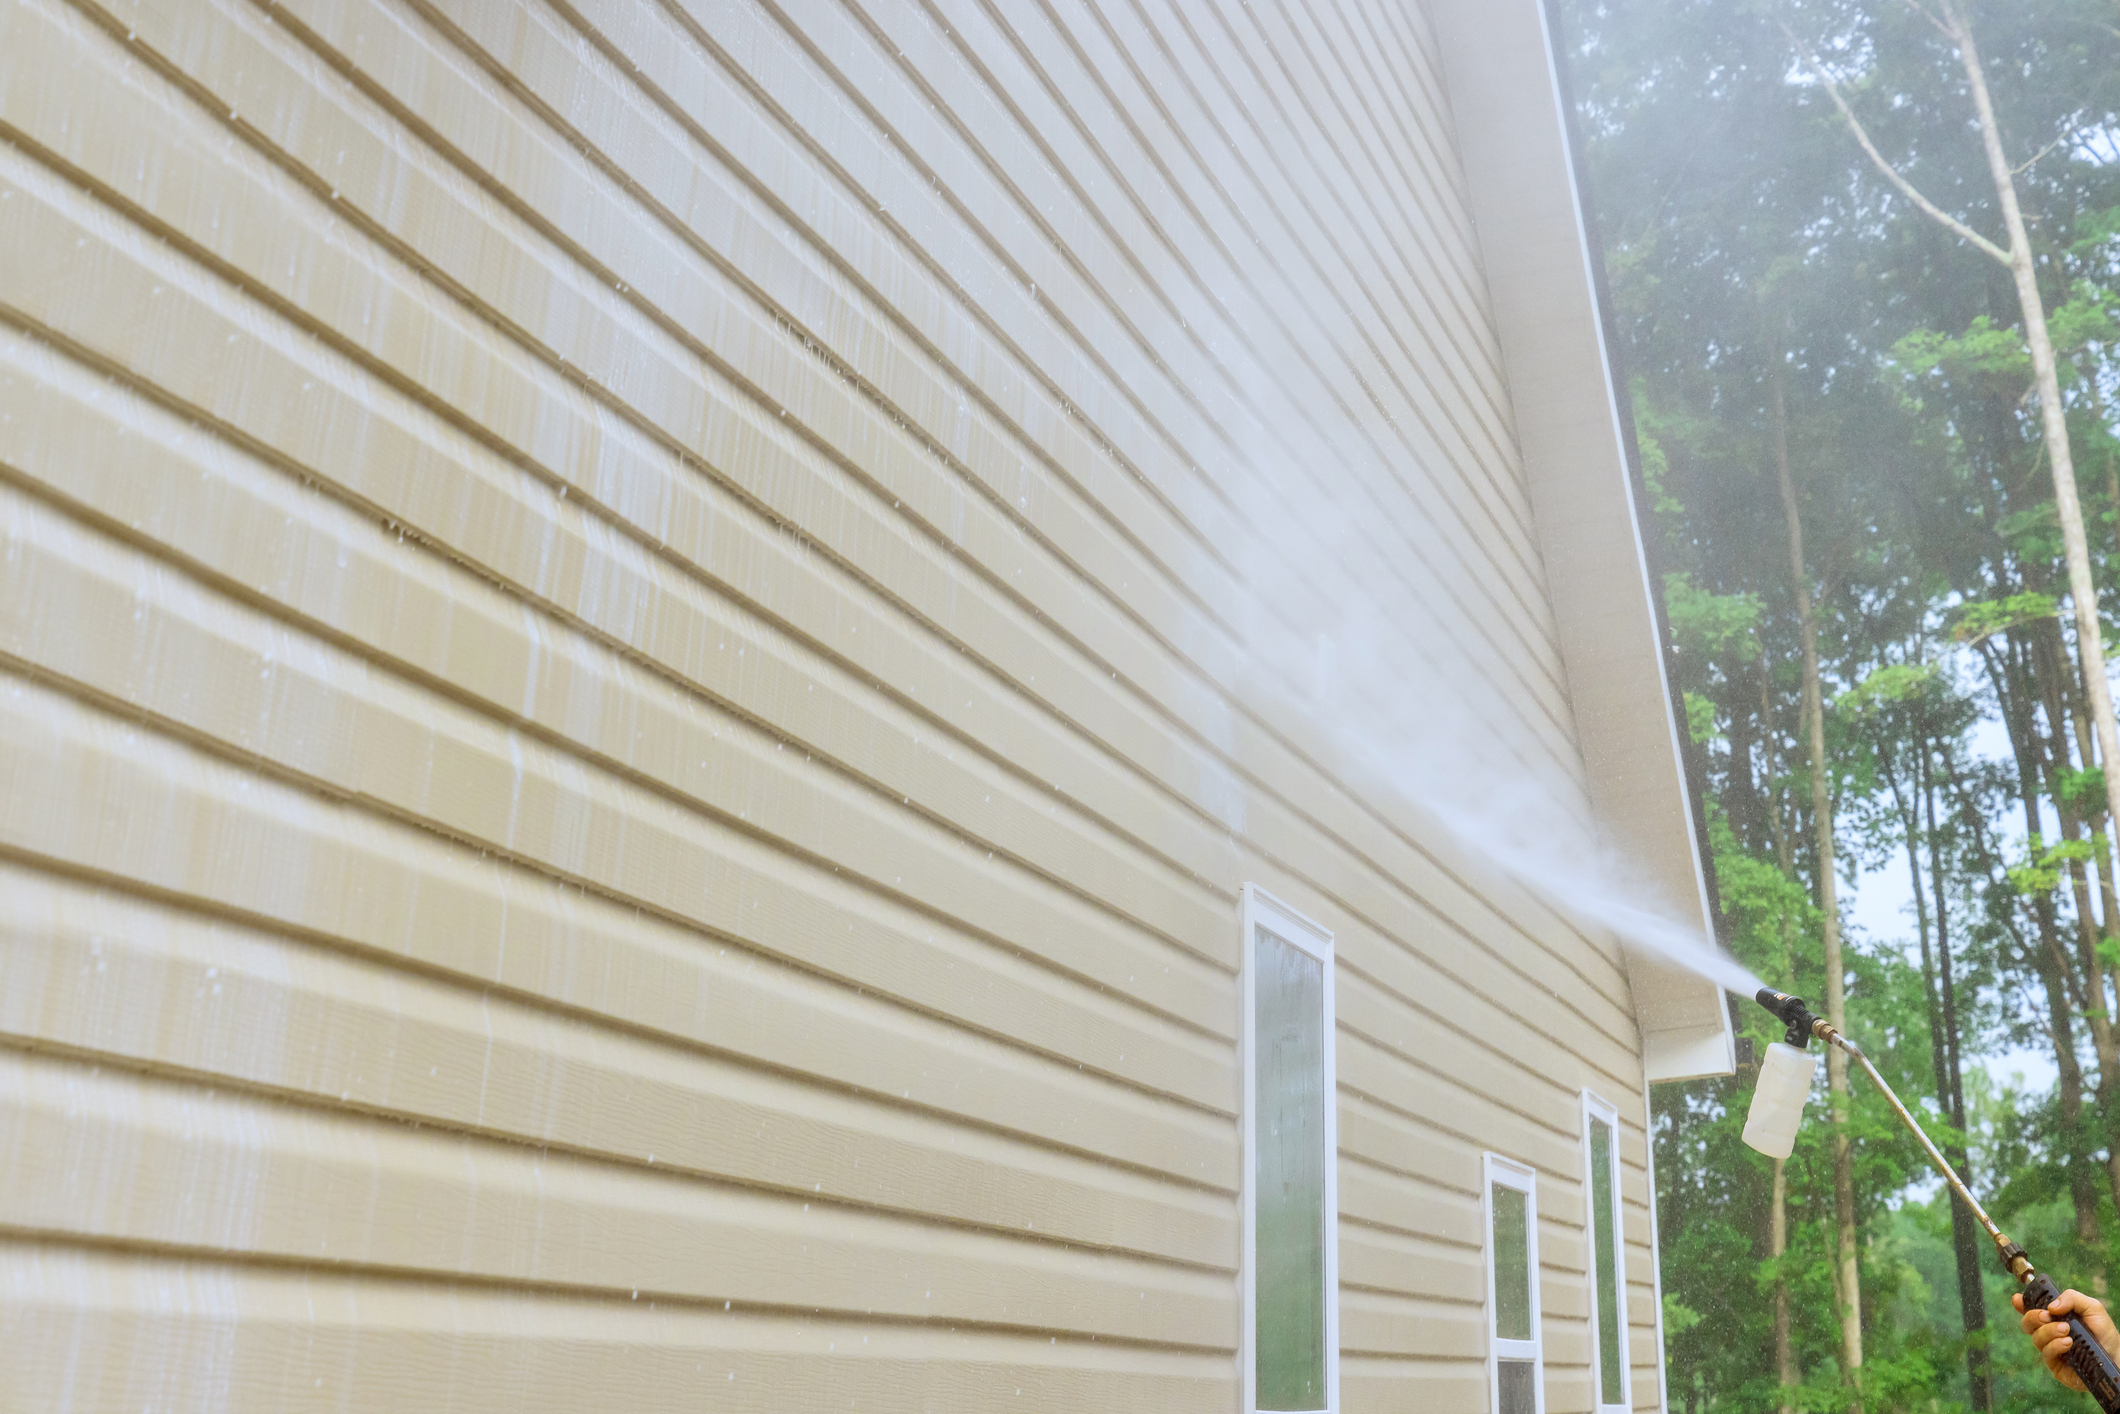
Make sure the surface is clean before painting it by utilizing cleaning techniques such as power washing. Painting over a dirty surface results in various issues, including adhesion problems, peeling, and cracking. Here at Custom Painting, Inc., we want to ensure your project for exterior painting in San Ramon, goes as smoothly as possible. That’s why we’ve put together this ultimate guide on how a clean surface impacts the result of your exterior paint job.
How does a clean surface affect exterior painting?
Having a clean surface before starting an exterior painting project is crucial for several reasons, all of which impact the paint job’s quality, durability, and appearance. Here’s how a clean surface affects exterior painting:
Adhesion – A clean surface’s most immediate and important impact is improved paint adhesion. Paint adheres best to surfaces free of dust, dirt, oils, and other contaminants. If the surface is dirty, the paint may not stick properly, leading to peeling, blistering, or flaking over time.
Longevity – A clean surface ensures that the paint job lasts longer. Dirt and grime can accelerate the degradation of the paint film, especially when combined with harsh outdoor elements like sun, rain, and temperature fluctuations. By starting with a clean surface, you minimize the risk of premature aging and degradation of the paint.
Appearance – Clean surfaces help in achieving a smooth and uniform appearance. Dirt, dust, and other particles can create a rough and uneven surface, which becomes noticeable after painting. A clean surface allows the paint to lay down smoothly for a more professional and aesthetically pleasing finish.
Prevention against mold and mildew – Cleaning the surface before painting, especially moisture-prone areas, helps remove existing mold or mildew. Painting over mold or mildew without removing it first can cause the problem to continue under the paint, potentially causing health issues and damaging the paint job from beneath.
Time and cost savings – Although it might seem like an extra step, cleaning the surface before painting can save time and money in the long run. A well-prepared surface reduces the likelihood of having to repaint or perform touch-ups due to poor adhesion or the appearance of defects.
Assessing your home’s exterior
Your home is no longer new, so its siding has accumulated dirt and particles that can affect your paint job. Weather elements also affect the quality of your home’s exterior paint, so the colors may fade over time, and the surface may have sustained some damage, especially without regular maintenance. This is why assessing your home’s exterior is crucial before painting it.
Identifying areas in need of repair
Depending on the size of your home or the severity of the damage, inspecting its exterior surfaces for damage can take a matter of minutes or a while. Here are the common areas of a home’s exterior siding that require repair:
- Cracked or broken siding may allow water to absorb behind the siding, causing potential structural damage or mold growth.
- Loose siding panels may become loose due to physical impact, strong winds, or improper installation. Loose siding can be a risk for further damage to the siding system and the structure it protects.
- Rotting can compromise the siding and building’s structural integrity.
- Bubbling or blistering can occur when the vinyl siding is exposed to excessive heat or sunlight. It is an indication that the siding may fail and thus need replacement.
- Fading or discoloration from sun exposure, harsh weather, and age can cause fading or discoloration of siding materials, affecting the building’s appearance and potentially the material’s durability.
- Mold, mildew, or algae growth discolor the siding, indicating moisture problems that could lead to more serious damage if not addressed.
- Water stains on the siding may indicate leaks that need to be fixed to prevent structural damage.
- Dents and holes can occur in metal or vinyl siding from hail, debris, or accidental impacts. If not repaired, small holes and dents can lead to greater problems, like moisture intrusion.
- Peeling or chipping paint needs to be fixed not only for aesthetic reasons. Repairing them also protects the siding material underneath from exposure to elements.
- Missing pieces of siding leave the structure vulnerable to weather, pests, and rot. It’s crucial to replace missing pieces immediately.
DIY or hire a professional?
Deciding whether to DIY or hire professionals for exterior siding repair and painting depends on the following factors:
DIY:
- Cost savings – Doing exterior painting by yourself can save you money on labor costs, as you won’t have to pay a professional painter.
- Personal satisfaction – Completing a DIY exterior painting project can be personally rewarding and give you a sense of accomplishment.
- Flexibility – Since you don’t have a schedule to follow, you can control your schedule and work at your own pace.
- Learning experience – DIY painting can be an opportunity to learn new skills and gain experience in home improvement projects.
Hiring a professional:
- Quality results – Professional painters have the experience, skills, and tools to deliver high-quality results efficiently.
- Time savings – Professional painters can complete the job more quickly than DIY painters, allowing you to enjoy the newly painted exterior sooner.
- Convenience – When you hire a professional painter, you don’t have to bother researching paints, purchasing supplies, setting up equipment, or spending hours on the project.
- Warranty or guarantee – Many professional painters offer warranties or guarantees on their work, providing you with peace of mind.
Homeowner’s responsibilities before exterior painting
You’ve decided to update your home’s exterior with new paint and hired a professional, saving you time, money, and hassle. But do you have any responsibility for the project?
The answer is yes. Preparing your home for exterior painting is a big job. Before signing a contract, talk with your contractor about whether you can contribute to the project by doing the prep work before the crew arrives on painting day and how they should expect your house to be left for them when they start painting.
Some contractors may include prep work elements in their job quotes or be willing to do it for an additional fee. Nevertheless, here are some standard tasks when preparing your home for a professional exterior paint job (which does not include surface preparation):
- Clear the area by removing any potted plants, outdoor furniture, decorations, or movable objects from the vicinity of the work area.
- Trim back any bushes, shrubs, or trees that might touch or overhang the exterior walls, allowing painters to reach all areas of the walls without obstruction.
- If your sprinkler system has a set timer, turn it off before the crew arrives on painting day. You don’t want them to get soaking wet. Also, you don’t want some water drips or streaks landing in the paint finish.
- Keep children and pets away from the work area to prevent any accidental disturbances to the painting process and ensure their safety. If your pets or children leave some mess behind, clean up their waste and dispose of it properly.
- Protect bushes, flower beds, decks, and paved areas with drop cloths.
- Communicate with the paint crew about any specific instructions or concerns you have regarding the painting process, ensuring that both parties are on the same page and helping to avoid misunderstandings.
Gathering the necessary materials and tools
Quality materials are the key to a successful exterior paint job. Here is a list of essential materials and products:
- High-quality exterior primer
- High-quality exterior paint
- High-quality exterior caulk
- High-performance wood hardener
- Exterior-grade adhesive, depending on the type of surface you work on
- Patch filler, wood filler, or epoxy, depending on the type of surface you work on
- Mildewcide (for wet or humid areas or if the exterior surface has been previously affected by mold or mildew)
- Paint strippers or removers
- Detergent or surface any cleaning agent
Tools
Quality tools can make the exterior painting job easier and more efficient. They also ensure a smoother and more professional finish. Here’s a list of recommended tools:
- Power washer or pressure washer
- Scrapers and putty knives
- Sanding tools (use any):
- Sandpaper
- Sanding block
- Electric sander
- Caulking gun
- Paint application tools (use any of the three when applicable)
- High-quality paint brushes
- High-quality paint rollers and extension poles
- Paint sprayer
- Ladder or scaffold
- Drop cloths
- Plastic sheeting
- Painter’s tape
- Paint bucket and grid
- Safety gear:
- Goggles or safety glasses
- Gloves
- Dust mask or respirator
- Coveralls
- Hard hats
- If working at heights, fall arrest systems such as harnesses and carabiners are available.
Cleaning the exterior surface
Steps for effectively cleaning the walls (including pressure washing tips)
Cleaning the exterior walls before painting or before deck staining is crucial for achieving a smooth and long-lasting finish. Here are steps for effectively cleaning walls before painting, including tips for pressure washing:
Step 1: Gather supplies:
- Pressure washer (if using)
- Bucket
- Mild detergent or trisodium phosphate (TSP)
- Scrub brush or sponge
- Rubber gloves
- Safety goggles
- Drop cloths or plastic sheeting
- Garden hose (if pressure washer is unavailable)
- Ladder (if needed)
Step 2: Prepare the area:
- Remove furniture, decorations, and fixtures from the walls.
- Lay down drop cloths or plastic sheeting to protect floors and any remaining furniture.
Step 3: Inspect the walls:
- Look for areas with heavy grime, mold, or mildew.
- Note any cracks, holes, or damaged areas needing repair before painting.
Step 4: Dilute cleaning solution:
- If you’re using a mild detergent, mix it with water in a bucket according to the manufacturer’s instructions.
- If using TSP, follow the recommended dilution ratio.
Step 5: Safety Precautions:
- Wear rubber gloves and safety goggles to protect your skin and eyes from chemicals and debris.
Step 6: Washing
Option 1: Pressure washing
- Adjust the pressure washer to a low setting to prevent damaging the walls.
- Hold the pressure washer nozzle at a 45-degree angle to the wall surface.
- Start from the top of the wall and work your way down in a smooth, overlapping motion.
- Keep the nozzle moving to avoid streaks or marks.
- Pay extra attention to areas with stubborn stains, mold, or mildew.
- Allow the walls to dry completely before proceeding.
Option 2: Hand washing
- For areas where pressure washing is not feasible or effective, use a scrub brush, or sponge dipped in the cleaning solution.
- Work in small sections, starting from the top and moving downward.
- Scrub gently but firmly to remove dirt, grease, and stains.
- Rinse the walls thoroughly with clean water using a garden hose or sponge.
Step 7: Drying time:
- Allow the walls to air-dry completely before painting.
- Depending on the weather conditions and ventilation, this action may take several hours.
Step 8: Inspect for residue:
- Check the walls for any remaining dirt, grease, or stains.
- Repeat the cleaning process if necessary until the walls are clean.
Step 9: Repair damaged areas
- Fill in cracks, holes, or damaged areas with spackling compound or patching material.
- Allow the repairs to dry completely before proceeding.
Step 10: Final inspection:
- Once the walls are clean and dry, inspect them again to ensure they are ready for painting.
- Make any final touch-ups or repairs as needed.
Following these steps will help ensure that your walls are properly cleaned and prepared for painting, resulting in a professional-looking finish that will last a long time.
The importance of allowing the surfaces to dry completely
Allowing exterior surfaces to dry completely after cleaning before painting is crucial for several reasons:
Adhesion: Moisture on the surface can hinder paint adhesion, leading to premature paint failure such as peeling, cracking, or blistering.
Even application: Wet surfaces can cause paint to spread unevenly or create watermarks, resulting in an inconsistent finish.
Durability: Proper drying ensures the paint adheres to the surface, enhancing its durability and longevity.
Mold and mildew prevention: Moisture trapped under the paint can promote mold and mildew growth, damaging the painted surface over time.
Optimal finish: Dry surfaces allow the paint to cure properly, resulting in a smoother, more professional-looking finish.
Allowing exterior surfaces to dry completely before painting ensures optimal adhesion, durability, and a high-quality finish.
Tips for replacing damaged materials
Replacing damaged siding before painting the exterior of your home is essential for ensuring a smooth and visually appealing finish.
After cleaning the siding, follow the steps below to help you through the process:
Step1: Assess the damage
Carefully inspect the siding to identify areas that need replacement. Look for signs of rot, warping, cracking, or other damage. Take note of the extent of the damage and the type of siding material.
Step 2: Gather the necessary materials
Depending on the type of siding, you’ll need appropriate replacement materials. They may include siding panels, trim pieces, nails, caulk, and paint that matches your existing color.
Step 3: Take safety precautions
Before starting any work, ensure safety measures are in place. Use appropriate protective gear such as gloves, safety glasses, and a dust mask. If working at heights, make sure to use secure ladders or scaffolding.
Step 4: Remove damaged siding
Carefully remove the damaged siding panels, taking care not to cause further damage to adjacent areas. Use a pry bar or specialized siding removal tool to detach the siding from the underlying structure gently.
Step 5: Inspect the underlying structure
Once the damaged siding is removed, inspect the underlying structure for any signs of moisture damage, rot, or other issues. Address any structural problems before installing new siding.
Step 6: Cut and Install Replacement Siding
Use a saw or utility knife to measure and cut the replacement siding panels to the appropriate size. Ensure the new siding fits snugly into place and aligns properly with surrounding panels. Secure the siding with nails or screws according to manufacturer guidelines.
Step 7: Seal joints and gaps
Apply a bead of exterior-grade caulk along the joints and edges of the new siding to prevent moisture infiltration and ensure a tight seal. Smooth the caulk with a caulking tool or your finger for a neat finish.

Sanding and scraping
Removing old paint and smoothing surfaces is crucial in many renovation and painting projects. Here’s a list of tools and techniques for effectively removing old paint and ensuring surfaces are smooth for a fresh coat:
Chemical paint removers
- Liquid paint strippers dissolve the bond between paint and surface.
- Gel paint strippers cling to vertical surfaces and reduce dripping. They are usually thicker than liquid paint strippers.
- Paste paint removers are usually applied thickly to surfaces, making them ideal for removing multiple layers of paint.
Heat-based techniques
- Heat guns release hot air to soften the paint, making it easier to scrape off.
- Infrared paint removers heat the paint without blowing the hot air, thus reducing the risk of igniting paint fumes.
Mechanical methods
- Manual sanding uses sandpaper power sanders for more expansive areas. They are effective for smoothing surfaces.
- Scraping consists of using a handheld scraper to peel off loosened paint. This option is best after softening paint with heat or chemicals.
- Wire brushes remove paint from rough surfaces and crevices.
Power tools
- Electric paint removers have rotating brushes or discs to strip paint.
- Sanders and sandblasters work for heavy-duty removal and smoothing, especially on large, flat surfaces.
Eco-friendly options
- Soy-based gel removers are non-toxic and environmentally friendly. These removers work slowly to break down paint bonds.
- Citrus-based removers are another non-toxic removal option that uses the natural acids from citrus fruits to soften paint for easier removal.
Safety precautions for sanding and scraping
Whatever sanding and scraping methods and tools you use, including chemical and heat-based methods, wear protective gear, such as gloves, goggles, and respirators, to protect yourself against harmful dust and fumes.
If the house was built before 1978, test for lead-based paint. If lead paint is present, follow proper containment and disposal procedures to avoid lead exposure. Or better, have a professional to contain, remove, and dispose of lead paint.
Avoid dry sanding old paint as possible, as it can release harmful dust particles into the air. Wet sanding or using sanders equipped with dust collection systems is preferable.
If using chemical paint strippers, follow manufacturer instructions carefully, wear appropriate PPE, and ensure proper ventilation. Dispose of used chemicals according to local regulations.
Follow safe work practices, including proper lifting techniques, to prevent injuries while handling equipment and materials. Be cautious when working with flammable materials such as paint thinners or strippers. Keep them away from open flames or sources of ignition.
Each technique has pros and cons, and the best method often depends on the type of surface you’re painting, the existing paint’s condition, and the desired finish. It’s best first to test a small and inconspicuous area to ensure the chosen method is effective and doesn’t damage the surface.
Priming your home
The benefits of priming your home
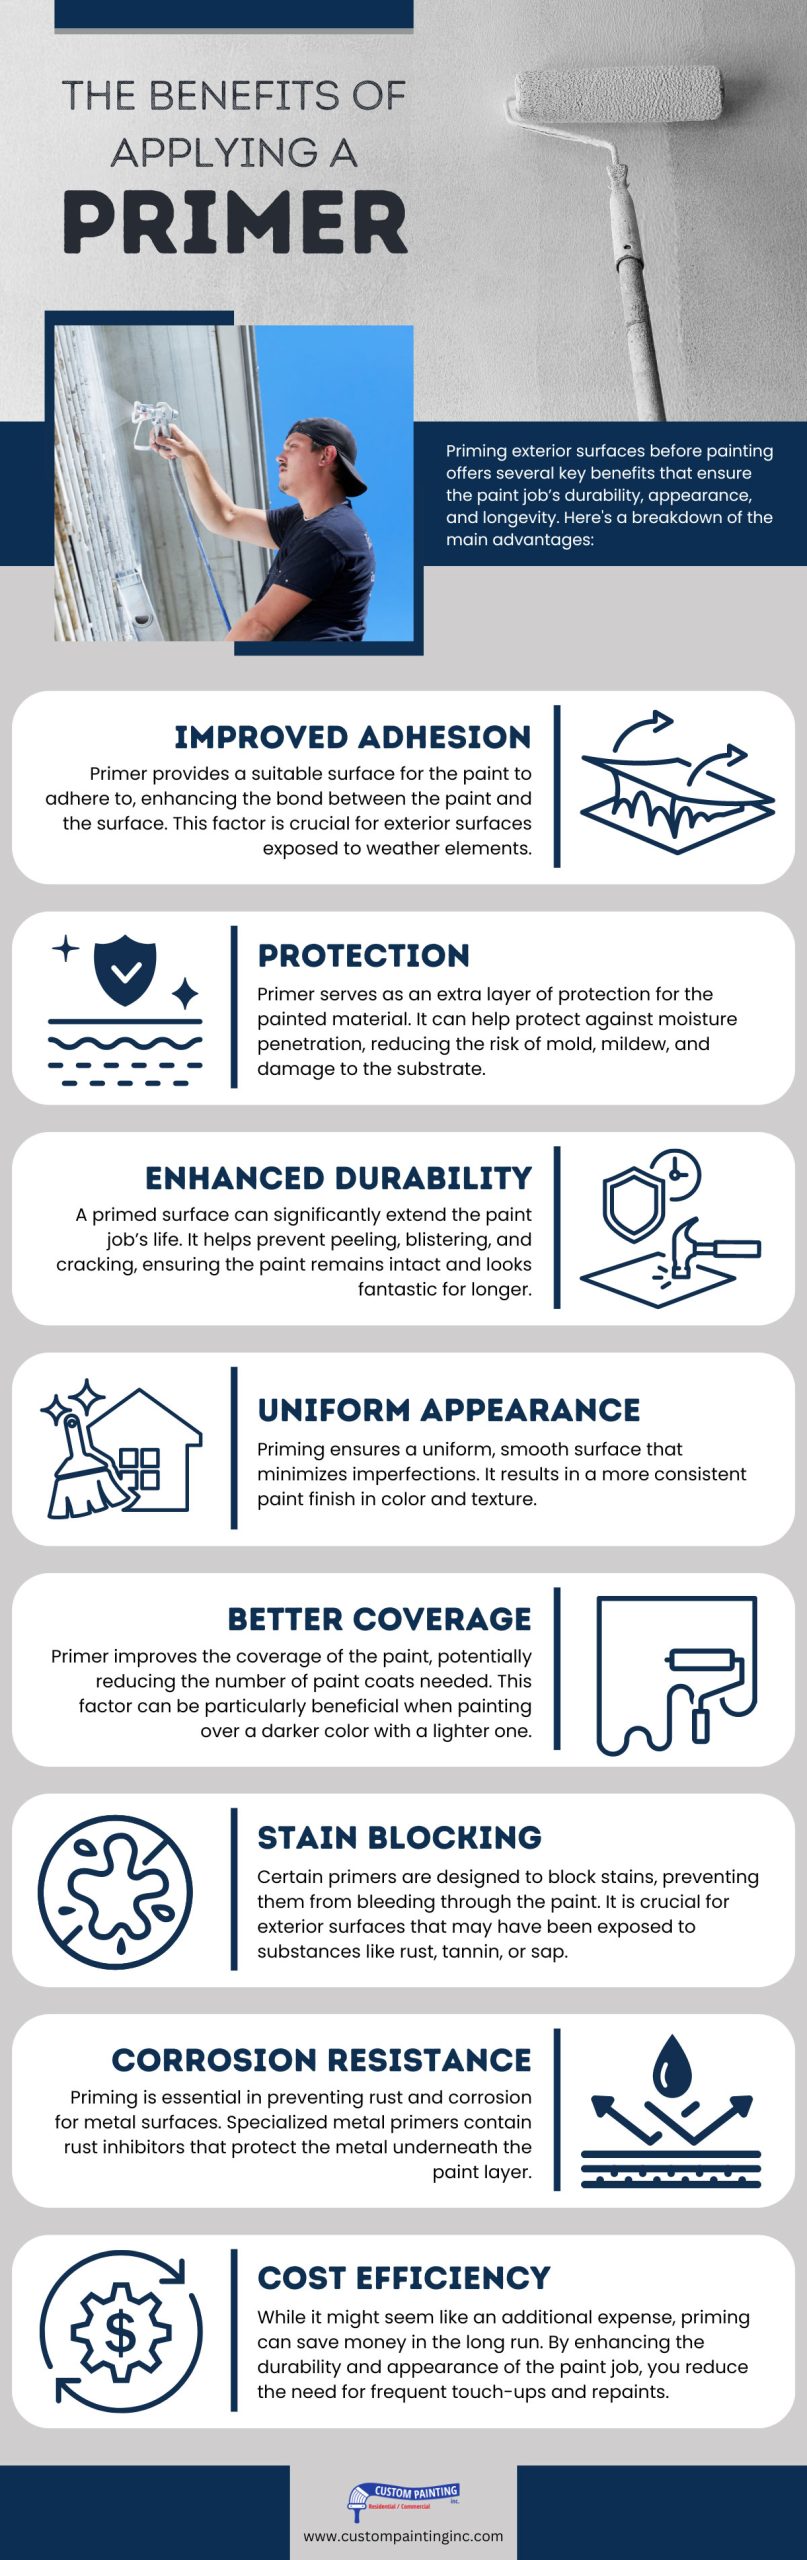
Priming your home’s exterior surfaces before painting offers several benefits:
- Improved adhesion – Primer creates a bond between the surface and the paint, ensuring better adhesion and reducing the likelihood of peeling or flaking
- Enhanced durability – Priming helps seal porous surfaces, preventing moisture penetration and providing a protective barrier against weathering, UV rays, and other environmental factors.
- Uniform surface – Primer evens variations in surface texture and porosity, resulting in a smoother, more uniform finish for the paint.
- Enhanced color and sheen – Using a primer can improve the vibrancy and depth of the paint color, as well as promote an even sheen across the surface.
- Cost and time savings – While it may seem like an extra step, priming can save time and money in the long run by reducing the number of paint coats needed for full coverage and ensuring a longer-lasting finish.
- Stain blocking – Certain primers contain ingredients that effectively block stains from bleeding through the paint, such as water spots, rust, or smoke damage.
- Mold and mildew resistance – Some primers are formulated with anti-microbial properties, helping to inhibit the growth of mold and mildew on exterior surfaces.
- Surface protection – Primer seals and protects the underlying surface from damage caused by moisture, mildew, and other environmental factors, prolonging the life of the paint job.
Selection criteria for the right type of exterior surface primer
Selecting the correct type of exterior surface primer involves considering several criteria to ensure optimal performance and longevity of the paint job. Here are some crucial factors to consider:
Surface type: Different surfaces require specific primers. For example, wood, metal, concrete, and masonry each have their own primer formulations tailored to their unique characteristics.
Weather resistance: Exterior primers must withstand harsh weather conditions such as rain, snow, UV exposure, and temperature fluctuations. Look for primers labeled as “exterior” or “weather-resistant.”
Adhesion: The primer should adhere well to the surface to ensure the paint bonds properly and create a durable finish. Choose a primer designed for the specific material you are painting.
Moisture resistance: Exterior surfaces are often exposed to moisture, so the primer should have moisture-resistant properties to prevent water damage and mold growth.
Blocking stains: If the surface has stains from water, smoke, rust, or other sources, choose a primer with stain-blocking capabilities to prevent them from bleeding through the paint.
Rust inhibition: When priming metal surfaces, especially ferrous metals prone to rusting, select a primer that contains rust inhibitors to prevent corrosion.
Flexibility: Exterior surfaces may expand and contract due to temperature changes, so the primer should accommodate this movement without cracking or peeling.
Coverage and thickness: Ensure that the primer provides adequate coverage and forms a sufficiently thick layer to hide imperfections and create a smooth base for the paint.
Compatibility: Ensure the primer and the paint you plan to use are compatible. Some primers are specifically formulated to work best with certain types of paint, such as latex or oil-based.
Application method: Consider the application methods (brush, roller, spray) and choose a primer that suits your preferred application technique.
Environmental impact: Some primers may contain volatile organic compounds (VOCs), which can harm the health and environment. Look for low-VOC or zero-VOC options if the environmental impact is a concern.
Drying time: Consider the drying time of the primer, especially if you have time constraints or need to apply multiple coats before painting.
Masking and covering areas
Preparing your area for exterior painting involves several steps to protect doors, windows, and landscaping. Follow some strategies below to ensure these areas remain protected during the painting process:
Doors:
-
- Cover door handles and hardware with painter’s tape or plastic wrap.
- Apply masking tape around the edges of the door frame to prevent paint from seeping onto surfaces.
- Use drop cloths to protect the ground beneath the door.
Windows:
- Apply painter’s tape around window frames to protect the glass.
- Use plastic or cardboard shields to cover windows during painting.
- Ensure windows are closed to prevent paint from getting inside.
Landscaping:
- Trim back vegetation and bushes near the siding to create space for painting.
- Cover plants and shrubs with drop cloths or plastic sheets to shield them from paint splatter.
- Water the ground around landscaping to minimize dust and debris during painting.
Recommendations for effective masking materials
Choosing the right masking materials for exterior paint jobs is crucial for achieving clean lines and protecting areas you don’t want to paint. Here are some recommendations for effective masking materials:
- Painter’s tape – Painter’s tape is designed specifically for masking paint and is available in various widths and adhesion levels. Look for painter’s tape labeled for exterior use, as it will be more durable and weather-resistant. Brands like 3M ScotchBlue, FrogTape, and Duck Clean Release are popular.
- Masking film or plastic sheeting – Masking film or plastic sheeting can be effective for larger areas or objects that need covering. These materials come in rolls and can be cut to size, taped, or secured. Look for thicker, UV-resistant plastic sheeting for outdoor use.
- Drop cloths – While not exactly for masking, drop cloths are essential for protecting surfaces like floors, sidewalks, and plants from paint splatters and spills. Canvas drop cloths are durable and reusable, while plastic or paper drop cloths are more affordable but may tear more easily.
- Masking paper – Masking paper can be used with painter’s tape to protect trim, windows, and other surfaces. It’s available in rolls and pre-taped versions for convenience.
- Masking liquid – Masking liquid or painter’s liquid mask is applied directly to surfaces you want to protect. Once dry, it creates a barrier that the paint won’t adhere to. It can be especially useful for irregular surfaces where tape might not adhere well.
- Cardboard or cardstock – For odd-shaped areas or small details, cardboard or cardstock can be cut and shaped to fit precisely where needed. Secure them in place with painter’s tape.
- Foam brushes or rollers – When applying masking liquids or paints, foam brushes or rollers can help achieve smooth and even application.
When choosing masking materials, consider the surface you paint, weather conditions, and the type of paint you’re using. Additionally, ensure that surfaces are clean and dry before applying masking materials to ensure proper adhesion and effectiveness.
Choosing the right paint
Choosing the right exterior surface paint for your house involves considering various factors to ensure durability, aesthetics, and protection against the elements. Here are some key factors to consider:
- Climate – Different climates pose different challenges to exterior paint. For example, humid climates may require paints that resist mold and mildew, while extreme heat or cold may necessitate paints with UV protection or thermal resistance.
- Weather resistance – Look for paints that withstand rain, snow, wind, and sunlight without fading, peeling, or blistering. Consider the level of exposure your house gets to these elements.
- Material of exterior surfaces – The material your house is made of will influence your chosen paint. Common exterior surfaces include wood, stucco, brick, concrete, metal, and vinyl siding. Each material may require specific types of paint and preparation.
- Color – Choose a color that complements your home’s architectural style, surroundings, and preference. Remember that darker colors absorb more heat, which can cause them to fade faster in sunny climates.
- Durability – Choose high-quality paints that offer long-term protection and resistance to fading, cracking, and chipping. Some paints come with warranties that guarantee their durability for a certain period.
- Ease of maintenance – Consider paints that are easy to clean and maintain over time. Some finishes, such as satin or semi-gloss, are easier to wash than flat finishes.
- Environmental impact – Look for paints with low volatile organic compound (VOC) levels to minimize harmful emissions and reduce environmental impact. Many eco-friendly paint options are available on the market today.
- Application method – Consider how the paint will be applied—brush, roller, or sprayer—and choose a paint compatible with your preferred application method. Some paints may require multiple coats or specialized equipment.
- Finish – The finish or sheen of the paint can affect its appearance and durability. Glossy finishes offer better moisture resistance and are easier to clean, while matte finishes hide imperfections better.
- Cost – Factor in the overall cost of the paint, including any additional materials needed for preparation and application. While higher-quality paints may have a higher upfront cost, they often provide better long-term value due to their durability and performance.
- Historical considerations – If your house is in a historic district or has historical significance, you may need to adhere to certain paint color and finish guidelines or restrictions.
Paint types and their respective advantages
There are several types of paint, each with its advantages based on the surface being painted, desired finish, and environmental considerations. Here are some common types of paint and their advantages:
Latex Paint (water-based)
Advantages:
- Quick drying time
- Low odor
- Easy clean up with water
- Resistant to yellowing over time
- Good for interior walls and ceilings.
Oil-based paint (alkyd)
Advantages:
- Durable and resistant to wear
- Provides a smooth, glossy finish
- Suitable for high-traffic areas and surfaces that require frequent cleaning
- Offers better adhesion to surfaces like wood and metal.
Acrylic paint
Advantages:
- Fast drying time
- Flexible and resistant to cracking
- Good adhesion to a variety of surfaces, including wood, metal, and plastic
- Suitable for both interior and exterior application
- Available in a wide range of colors and finishes.
Epoxy paint
Advantages:
- Extremely durable and resistant to chemicals, stains, and abrasion
- Provides a smooth, hard finish
- Ideal for high-traffic areas like garage floors, industrial floors, and concrete surface
- Offers excellent adhesion and waterproofing properties.
Enamel paint
Advantages:
- Hard, durable finish
- Resistant to moisture, stains, and wear
- It provides a glossy or semi-glossy finish
- Suitable for use on metal, wood, and other surfaces
- Easy to clean and maintain.
Chalk paint
Advantages:
- Creates a vintage, matte finish
- Requires minimal surface preparation
- It can be applied to various surfaces without the need for priming or sanding
- It offers excellent coverage and is easy to distress for a weathered look.
Spray paint
Advantages:
- It provides a smooth, even finish
- Ideal for intricate or hard-to-reach areas
- Fast drying time
- It can be used on various surfaces, including wood, metal, plastic, and glass.
Choosing the right type of paint depends on factors such as the surface to be painted, the desired finish, durability requirements, and environmental considerations. Considering these factors carefully is essential to achieve the best results for your painting project.
Challenges of painting a home’s exterior
Here are some common challenges when painting your home’s exterior:
- Weather conditions – Rain, wind, and extreme temperatures can affect paint application and drying.
- Surface preparation – Properly cleaning and preparing surfaces is crucial for paint adhesion and longevity.
- Access and safety – Exterior painting often requires working at heights, necessitating appropriate safety measures and equipment.
- Choosing the right paint – Selecting paint with suitable durability, weather resistance, and color retention is essential.
- Time and effort – Exterior painting can be time-consuming and labor-intensive, especially for large or intricate structures.
- Budget considerations – Costs, including paint, equipment, and possibly professional labor, can add up quickly.
- Dealing with existing issues – Addressing any existing damage, such as cracks or rot, before painting is necessary for a successful outcome.
- Regulatory compliance – Understanding local regulations regarding paint types, colors, and application methods is important.
Planning your painting project
Best practices for timing and sequencing your paint job
Timing and sequencing your exterior paint job properly helps achieve the best results and ensures the longevity of your paintwork. Consider the following practices:
Timing
- Consider the weather before deciding to go out and paint.
- Avoid painting when it’s rainy.
- Be cautious of painting when there are noticeable temperature fluctuations between day and night, which can cause the paint to dry unevenly.
- While painting, try to avoid direct sunlight as it can cause the paint to dry too quickly, leading to cracks, blistering, and other imperfections.
Sequencing
- Prepare the surface first before painting
- Apply a high-quality primer to the walls.
- Begin painting from the top and work your way down.
- Paint in sections to maintain a wet edge to ensure a more uniform application and reduce the chances of streaks or lap marks.
- Once you’re finished painting, follow the manufacturer’s recommendations for drying time between coats.
- Once the paint has dried, inspect your work and apply touch-ups as needed. Look for any missed spots, drips, or uneven areas.
- Properly dispose of debris and hazardous materials, and clean your tools according to the manufacturer’s instructions.
How long does it take to prepare a home’s exterior before painting?
The average time range is 16 to 24 hours, depending on the repair needed.
How long does it take to paint a home’s exterior?
The usual answers will be:
- 1,000 to 1,400 square feet for 2 to 3 days
- 1,800 to 2,100 square feet for 4 to 6 days
Custom Painting, Inc. has painted a 5,600-square feet home. Our crew tackled the project in sections so as not to disturb the family for a long period.
Conclusion
The impact of a clean surface in exterior painting is significant, affecting everything from the paint’s ability to stick properly to its longevity and overall look. Taking the time to properly clean and prepare surfaces before painting is an investment in the quality and durability of the paint job.
At Custom Painting, Inc., we understand the unique needs of our residential and commercial clientele. As painting contractors with over 40 years in the industry, we offer the best paint to withstand the rigors of everyday wear-and-tear and weather elements.
We also understand that you want to be able to use your space quickly, whether you want your home or business painted. Our quick and efficient painting, repair, and custom installation services ensure you can return to your space as quickly as possible.
To learn more about paint, carpentry, repairs, and custom installation services, call Custom Painting at 925-294-8062 or fill out the online form to schedule an appointment. We always provide job estimates for free! We look forward to working with you.
