

Patching and painting interior drywall can be challenging. There are loads of work to do and some precautions to consider. Professional painters from Custom Painting, Inc. are skilled in drywall patching for your Dublin, CA home including replacing sheetrock, and painting rework as needed.
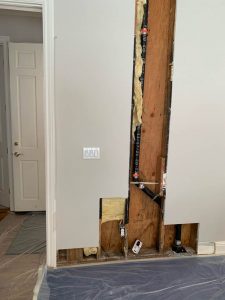
This house had missing sheetrock, so our team fixed the opening and painted the room. Here are the typical issues painters usually encounter when drywall patching is needed:
- Bad patching – For example, some patches consist of cracks or nail holes filled with spackle but not sanded or feathered. There’s another instance where cracks or holes are filled with tinted spackle or compound, making it noticeably different from the rest of the wall.
- Drywall dust – Sanding the drywall will result in powdery dust – it’s something that painters and carpenters usually deal with. But sanding the drywall with the compound produces heavier, sawdust-like particles dropping to the floor instead of drifting into the air. (photo)
- Drywall holes of various shapes and sizes – There are many causes for scuffs, dents, and holes on drywall, such as a doorknob or furniture banging into it.
- Damage to surrounding surfaces – The surrounding damage may include floor damage, light switches covered with paint, furniture stains, or drywall spots.
- Drywall replacement – Drywall replacement is necessary when patching cannot solve the problem. The common causes of drywall replacement include:
- Bigger cracks and holes
- Discoloration
- Severe mold and mildew
- Drywall rot
Types of drywall
- Regular drywall – This type of drywall is commonly used for most homes. It is typically 1/2-inch thick, and the standard drywall sheet size is 4 feet by 5 feet, but it is also available in lengths up to 16 feet for areas with high ceilings. It is also known as white board.
- Plasterboard – It is the base for many plasterboard applications, much like the lath-and-plaster walls. It is also known as blue board.
- Soundproof drywall – It is commonly installed in areas where soundproofing is required, such as living spaces and between walls. This type of drywall is usually thick and, thus, challenging to install.
- Fire-resistant drywall – It contains fiberglass, which slows down the fire. Fire-resistant drywall is usually installed in areas with equipment or chemicals that could cause fire, such as garages (for walls and ceilings) or where a stove is used.
- Mold-resistant drywall – It has a paper backing that’s thicker than regular drywall. It is also coated with wax to resist water and moisture. It also has a non-organic material that doesn’t provide the “food” the mold needs to grow and spread. It is usually installed in bathrooms, kitchens, laundry rooms, basements, and places with constant moisture. It is also known as the green wall.
 Requirements for painting new drywall (photo)
 Requirements for painting new drywall (photo)
- Adequate lighting – Daytime light is always the best light source, but you can use any proper and powerful lighting in case of doing the work in dark areas.
- The right temperature – Ideally, it should be at least 60 degrees Fahrenheit. A drastic temperature change could cause movement from the surface to the seams. The movement could lead to new defects. Be sure to repair surface flaws and seal your new drywall before painting.
Tips and tricks in patching drywall
It pays to have the right tools and materials for patching drywall for this job.
Tools:
- 200-grit sanding paper or sanding pole
- Dust mask
- Goggles
- Paintbrush
- Caulk gun
- Wall anchors
- Drill
- Hammer or mallet
- Screwdriver
Materials:
- Joint compound
- Caulk
- Primer
- Paint
1) Tips for covering/protecting all surfaces before working are essential:
- Move the furniture out of the work area. If that’s impossible, move the furniture to the center of your room or cover them to keep dust and paint off.
- Cover the floor to protect it from dust and paint.
- Unscrew all the switch plates (if they’re located on or near the drywall to be patched and painted) and cover the outlets with painter’s tape.
- Start coverage from the ground up, adding more layers of protection on the wooden floor to prevent dust, paint, and tool damage.
- Add more plastic sheeting for easy cleanup during the work process.
- Continue covering furniture and all non-working process.
- Place additional plastic sheeting to capture debris.
 2) Tips for eliminating water damage from your drywall
Water damage is the cause of many sorts of problems in your drywall: stains, a sagging surface, and spots of mold and mildew.
Drywall is very porous, making it easy to absorb moisture. Prolonged exposure to moisture can cause your drywall to lose structural integrity or experience other problems.
Here’s how to get rid of moisture from your drywall before proceeding to other necessary work:
- Remove all wet or damaged drywall insulation
- Let the interior structure completely dry before doing any repairs.
3) Tips for securing loose drywall (photo)
If your drywall doesn’t look like it’s installed securely, it’s usually the problem of the screws or conical anchors attached to it. They may have rusted over time or moved the drywall, creating a bigger hole that may no longer sufficiently hold the screw, resulting in loose drywall.
Whether your drywall screws or anchors have rusted or not, you may want to purchase new screws or anchors to replace them.
Fortunately, this is a relatively quick fix, and your drywall will be secured quickly.
 Follow the instructions below to tighten loose drywall:
- Place your drywall over the studs.
- Drill small holes to set the anchor.
- Using a hammer or mallet, tap the anchor.
- Insert the anchor and use a screwdriver to secure it into the drywall and the stud underneath it.
4) Tips for sanding previous patches
After patching the damaged areas on your drywall, sand them next.
The following tips ensure a smooth, even, and seamless surface:
- If you have done a smaller patch job with a compound, you may need a hand sander, a package of 150-grit precut sandpaper sheets to fit your hand sander, and a sanding sponge for sanding corners. You may also need a pole sander for sanding hard-to-reach areas and painted walls.
- If you have done a patch job that has covered a larger area with a compound, go for a power sander. It will save you time and effort. But because this tool is powerful, you should start with 150-grit sandpaper to prevent sanding too much to the point of damaging the surface. Then, you can finish it with even finer sandpaper – from 180-grit to 220-grit – for the best results.
- Make sure to wear goggles and a dust mask for protection. It’s better to use a double-strap dust mask rated for nuisance dust.
 5) Tips for priming glossy surfaces
If you are painting over a glossy surface, it’s necessary to prime it to ensure better patches and texture bonding.
- Make sure that the surface is clean and dry.
- A “super-grip” primer is recommended for applying over glossy surfaces. It adheres well to glossy surfaces, so you don’t have to sand them before priming.
- Apply only one coat of the super-grip primer and allow it to dry completely.
6) Tips for applying a thin layer of compound
Applying a thin-enough layer of joint compound or spackle is essential and allows it to dry between applications.
- Use a paint roller instead of a sprayer. While a sprayer may be quicker and more efficient than applying a thin layer of spackle or compound, a paint roller is more cost-effective and almost as efficient. Besides, using a sprayer may cause overspray, which means your spackle or compound may be blown beyond the target surface.
- Prepare your work area by laying down drop cloths on all nearby walking surfaces and taping off areas (such as trim) you don’t want to paint.
- Use a mixing attachment to your power drill. Mixing the compound to achieve a thin-enough consistency (like yogurt) will save you time and effort.
- In the absence of daylight, place an adequate light source at an angle to the surface where you will apply the spackle or compound.
- Use a taping knife, scraping tool, trowel, or any edged tool to smooth down the first coat of the spackle or compound.

Adding thin layers of spackle or compound, each application wider than the last, will help you to spread the patch area into surrounding surfaces for the best and most even transition. You’re also minimizing dust at the same time.
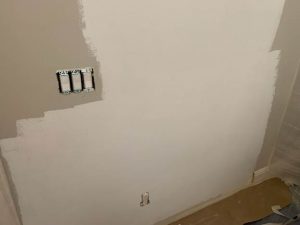
Apply a drywall primer
Although a primer is unnecessary, it’s crucial in other situations, such as painting new or previously painted drywall. A primer will seal the surface and help the topcoat stick more uniformly to it.
A general latex primer is fine for patched drywall. It dries quickly and doesn’t chip, crack, or peel. Most latex primers are low on volatile organic compounds (VOCs), but zero-VOC primers are also available.
 A PVA primer or emulsion primer is best for new drywall.
Roll one coat of latex or PVA primer to the surface. It will seal the surface and expose areas that require more attention before applying the topcoat. These primers also enhance the topcoat’s color and sheen.
Replace baseboards and trim and caulk joints
Wood is the most durable type of baseboard and has been a long-time favorite. Medium-density fibreboard (MDF) is a relatively recent development but has soared in popularity primarily because of its price and availability.
MDF may be a good option, especially if you have many baseboards to install. It can also be sculpted into various shapes, from simple to ornate. But MDF baseboards are soft compared to wood, making them more prone to dents and water damage.
- Install any baseboard or trim.
- Be aware that you caulk joints and on top of baseboards, where they meet the wall with paintable caulk, creating a nice finish.
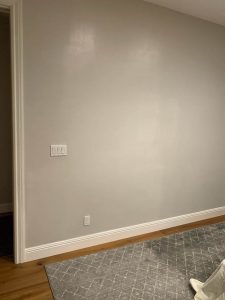
Paint over the patched area
It’s best to apply thin and wide coats of paint to cover the area beyond the patched surface.
Clean up after the work is complete
After painting is complete, professional painters make sure the space is clean, and all the objects in the area are put back in their original place. Our painters do the cleanup immediately after the paint has dried.
- Remove any painter’s tape before the paint has the chance to dry.
- Keep a damp cloth nearby to wipe off wet paint drips and splatters.
- Fold the edges of the damp cloths or plastic sheeting toward the middle to avoid smaller spills or drips on nearby surfaces.
- Let the paint dry completely before putting back the furniture, hanging back wall decor, and re-installing switch plates.
Conclusion
 Conclusion
 Drywall patching and painting are common home maintenance tasks that homeowners can do themselves. It can be a challenging project, especially if you have many things to patch and paint. But as long as you have the right tools, follow procedures correctly, and pick up the best tips and tricks, you can restore the look of your drywall to its original appearance. Your drywall will look again as if nothing happened.
Turn to Custom Painting, Inc. if you need drywall patching or your home repainted. Founded in 1982, we are a licensed and insured full-service residential and commercial painting service company servicing key cities in the Bay Area. Our team consists of full-time professional painters and carpenters.
Don’t hesitate to contact our office at 925-294-8062 to schedule an appointment with our estimator or complete the request form on our website to request an appointment or get more information about our services.
